
How to create a book cover template layout
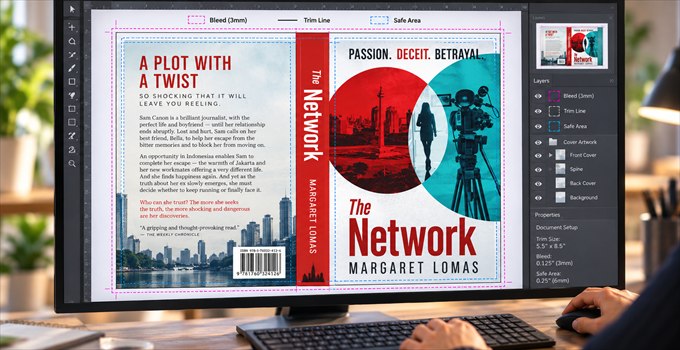
First you need to know what book you're making. This is where bits like trim size, binding, paper and final page count really matter. They are what dictates the exact measurements of the template your printer gives you. This is the first time you get to see how the front, spine and back actually sit, where the barcode goes and all the bits and pieces like the bleed and safe areas around them.
A cover image isn't always ready for the template
You can have a front cover totally finished and still be a long way off a print-ready template. Artwork must be the right resolution, fonts need embedding, colors must all be optimized for the way they will appear in CMYK not RGB.
But that's just to prep the front. A full cover includes a spine and a back cover too. So artwork often needs extending around the spine and back, and text needs placing. Having a front cover you're completely happy with and having a cover that's actually ready to print are two quite different things.
The template changes for each binding type
A paperback, casebound hardback and dust jacket all need different layouts. The same basic design needs a very different template just depending on how the book will be bound.
A paperback is normally one complete spread, with the back on one side, the spine in the middle and the front on the other.
A casebound hardback is particularly tricky. The printed design needs to wrap right round the solid boards, but in the right way to allow for the spine, hinge areas and the extra artwork wrapping the outer edges. Even putting the title in the right place is tough on this one. So, do you center from the hinge or visually across the board?
Dust jackets are different again. As well as the front, spine and back, you've now got two flaps that fold inside the covers to manage and produce additional content for.
Then the measurements change for every book
Even once you've chosen your binding, the template is in no way fixed. The trim size determines the size of the front and back. The page count and paper then set the width of the spine.
This is why the interior needs to be more or less finished before the cover can be completed. Add another twenty pages and the spine gets wider. Change the paper and it changes again. With very thin books, some printers won't allow spine text at all. In other cases, a small strip of text might technically fit but still look better without it.
So there isn't really one generic template for a 6 x 9 paperback. You need the template for your particular 6 x 9 paperback, with its particular paper and final number of pages.
Bleed and safe areas
These are the extra spaces and guides around your cover to give the printer some wiggle room. Bleed means continuing artwork past the edge where the cover will be cut, then if things shift a fraction, you don't get white gaps down the sides. Safe areas do the opposite by keeping important text and images away from edges, folds and the spine.
Often print templates will provide this marked out for you. If not, it's a few minutes in InDesign to set everything up to spec. Borders and sharp color changes near edges are the most awkward, as even tiny movements suddenly become really obvious.
The back cover needs designing too
The front tends to hog all the attention, but the back needs a look in too. You've usually got a blurb to fit in, maybe some reviews or author details, and then the barcode needs a good spot. It can all get crowded surprisingly quickly.
The trick is making it look as if it belongs to the same cover. Fonts, colors and artwork need carrying across from the front. Sometimes this means extending a background or rebuilding a bit of an image so there's actually something useful to work with on the back. And don't worry about making the barcode yourself. If you have the ISBN, we can generate the barcode from that and drop it straight into the finished artwork at the right quality.
Changing printer can mean changing the cover
Once a cover is set up for one printer, it's tempting to think you can just send the same file somewhere else. But often you can't. Fractionally thicker paper will change the spine width, different printers have varying allowances for things like bleed, hinges and wrap.
So even though the book itself hasn't changed, and the cover looks exactly the same, the file underneath will typically still need setting up again for the new printer. Same design, different template.
If your cover is already designed
Sometimes the creative part is done. You may already have gorgeous artwork and know exactly how you want to present it. But you'll still need someone to turn this into a complete cover that your printer can actually use.
We can take over from there. Fit it to the right template, extend the artwork, build the spine and back, add the barcode and prepare the final print-ready PDF. And because we're not starting from scratch, it all costs considerably less than a full book cover design. Just send us what you've got and let's get started.